
Sunday, December 23, 2012
Sunday, December 9, 2012
I'm Back!... Ish...
So, I haven't posted anything since October 19th. That's a long time. Part of it was not doing anything, part of it was depression, part of it was NaNoWriMo (or the struggle and lack thereof), and part of it was the stupid weather.
I hit a craft wall. I was working on tatting, and then it just wasn't making me happy, so I stopped. Thus, not much to post about.
I was/am depressed, which makes me not want to do the things that I want to do. Confusing? Yes. Frustrating? Extremely. Not wanting to do what you want to do causes some paradox in the brain, and keeps me from having things to post.
NaNoWriMo, or National Novel Writing Month, is a literary event every November that for some reason I continue to volunteer as a Municipal Liaison (regional organizer) for despite the past few years being less rewarding of an experience than I'd like. This year looked like it was going to be better; I was working with a local library, my writers were getting involved in organizing locally, I had an idea for my own noveling that might have gotten me through the month. But then, Hurricane Sandy hit, and all that went out the window. I had expected NaNo to interfere with any creative endeavor that wasn't writing, but the hurricane threw in a wrench I was not prepared for. Twelve days without power, the library closed even longer, and outside of a few regulars and really enthusiastic writers most people fell off the radar. I didn't get very far with my novel, either (around 9k, handwritten, some by candle and lamp-light).
The weather. We got pretty lucky - no real house damage (some metal flashing around a window came off), although a tree came down on our neighbor's fence. But no power really messed with my head, especially with the pre-existing depression. Add to that having to leave home due to no power, limiting access to supplies if I had even had the interest.
As another irritant, my laptop has met its untimely end, and I am limited to a tablet or old desktop, which adds some complications to uploading images and formatting posts.
Long story short, expect some posts, but not a lot, especially with the holidays. Maybe once everything has settled down I will get into some sort of regular posting habit.
-Paige
Friday, October 19, 2012

Thursday, October 18, 2012

Wednesday, October 17, 2012

Sunday, September 23, 2012
Photography: Autumn

I took this picture during college, in the woods on campus. A lot has changed since then, but the leaves still change colors and fall from the trees every autumn.
Saturday, September 22, 2012
Photography: Champagne Mustache

A fun photo from a wedding I attended. Who can resist googly eyes and stick-on mustaches?
Friday, September 21, 2012
Photography: Pink

This is a picture I took of a flower in a gas station on a drive down the East Coast. It was so bright, and so atypical of what we think of when we think of gas stations (grey, smog, dirty) that I couldn't resist. That, and the water beading on the petals. Just so happy and full of life.
Thursday, September 20, 2012
Photography: Spiral

This is another photograph from our time on Fire Island. I thought that the shape of the shell was beautiful, the ridges and sand worn parts and spiral. The colors also drew my eye, especially the grey-green-blue of the metal reflected in the colors of the shell. I tend to compose photos with elements far to either side, so this is a nice break from that habit. I am drawn to the ocean, as much as I don't really want to be in it (I'm not an ocean/lake swimmer). This fills a tiny bit of the void that not living close to the shore leaves.
Wednesday, September 19, 2012
Photography: Fire Island

I have to admit that I probably was drinking when I took this picture of the railing around the deck off the bar on Fire Island. I was trying to learn how to force my digital camera to focus where I wanted it to, rather than letting the auto-focus ruin all the images I could see with my eyes but not duplicate with my camera. I really love the way the texture of the wood grain stands out with the light string, trailing off into the darkness, with a few points of light of other buildings off in the distance. This picture brings back a lot of wonderful memories of the fun we had out on Fire Island.
Tuesday, September 18, 2012
Photography: Jump

This is a picture of my friends' children at a summertime gathering a couple years ago. I was really lucky that I took a picture just as she was jumping. I love the way her curls just sproing and she looks like she's about to take flight. The cute face doesn't hurt, either.
Monday, September 17, 2012
Photography: Sarah

This is a picture of my sister. I don't remember exactly when or where. I really love the way the sky and trees present the perfect background, and how you can't really see her face but there's no way it isn't her. I am pretty sure I took this with my whoa-old point-and-shoot digital (it was my parents before it was mine, back when digital cameras were as big as film cameras, lol). It's just a picture that makes me feel happy, and I like the composition as well.
I'm a bad blogger.
Okay, so it's been too long without a post. Bad blogger. I promise I'll try to be more regular.
Since I'm stagnated on crafting, and haven't taken the time to take photos of my works in progress, I'm gonna do a week of photographs that I've taken. Not as exciting as the crafts, maybe, but still artistic things that I've done. Hopefully by next week I'll have cracked this craft-freeze and will have some new things to show.
Since I'm stagnated on crafting, and haven't taken the time to take photos of my works in progress, I'm gonna do a week of photographs that I've taken. Not as exciting as the crafts, maybe, but still artistic things that I've done. Hopefully by next week I'll have cracked this craft-freeze and will have some new things to show.
Sunday, September 9, 2012
Yikes! I gotta get back on this thing!
So my computer went a little crazy (I think it might be heat related) and was typing Zs all over everything. School started up again, so that was a little crazy too. I haven't really had a chance to find more pictures of old crafts or work on/complete any new crafts, so I haven't had anything to post. This is less than ideal, so I am going to try to get on that this week. Worst case scenario, I may start posting uncompleted crafts, in the hopes that putting it out there on the interwebs will motivate me to get something done. So, apologies that I've been quiet for over a week, I'm gonna fix it, I promise.
Friday, August 31, 2012
Old Pants Deconstructed Corset (Tan under-bust)
 |
| I swear there's a corset behind everything! |
Backstory: We were going to a post-apocalyptic LARP, and I wanted to craft a "work corset" for my character to wear. (See the Swampy Outfit post for more about LARP.)

First, I deconstructed the pants. They were my father's old work pants, so there was plenty of fabric to work with. I decided to use part of the back of the pants to create leg aprons with pockets (going for a utilitarian look here), so I set that aside, then figured out how to use the rest of the pants.
I thought it would be cool to use the pants pockets on the corset somehow, so I seam-ripped them apart from the other part of the fabric. I cut them long enough that I could put them over the front panels between the first and third panels. I sewed the panels together using the sandwich method, adding black strapping between the first and second panels for the front buckle closures. I sewed the bone channels as I went, so I was able to fold back the pockets while I sewed the channels in the second panel, then lay them back over to sew the seam between panel two and three. I also added strapping across panel three (which I used to clip a water bottle to at the event).

What I learned: The black strapping is cool, but I think next time I'll look for something that is heat friendly (I accidentally tapped it with the iron a few times when trying to press seams, you can imagine the burny smell and meltiness). (From writing these blogs, I've learned that I don't do anything with the appropriate amount of time allotted.)
What I might try next time: I would try to be a little more careful with lining up my pieces. I was working with scraps, so some pieces barely had enough fabric to cover the whole piece, and it actually contributes to the look for it to be held together with safety pins and willpower, but I like my pieces to have a certain level of quality to them, even if they are supposed to look like they are falling apart.
Final Thoughts: Well, I only went to this particular game twice, but I really liked the idea behind the costume (my sketch for it is actually way cooler than the outfit itself). I have worn the corset as part of an outfit while out for a friend's birthday at a bar, so I am not worried that I won't get good use out of it. It was another adventure in short deadline corsetry that turned out pretty well.


 |
| Picture by Thomas Senger (my crop) |
My First Corset (Black mid-bust)
The Do-Everything Corset (Black under-bust)
Claymore Corsets (White over-bust)
Rikku/Steampunk Corset (Green mid-bust)
Thursday, August 30, 2012
Rikku/Steampunk Corset


 | ||
| The original costume, 2009 |
How I did it: I tweaked the pattern I've used for the Dore a little again, then cut out the pieces from the leftover fabric. For this corset I gave hip gussets a try, because I needed a little extra space in the hip and lower back edge.
I inserted the busk and then sewed the pieces together using the sandwich method previously referenced. At the back edge I pressed the fabric over and top-stitched right next to the edge to finish each half. I created bone channels as usual, except I left out some of the mid-panel bones because the panels were not really wide enough at the waist to accommodate an extra bone. It is boned with 1/4 in spirals and 1/2 in flat steels. Then I attached the binding in a similar way to what I did for the black underbust, by machine sewing the binding to the outside then flipping it to the inside and top-stitching from the outside to create a nice stitch effect (the inside is slightly messier looking because there is a flap of fabric that was excess from the binding, but nobody has to see the inside now do they?). I also sewed a simple rectangle of fabric to function as a modesty panel behind the lacing (no bones in it, just fabric that I usually have to have someone else help me straighten out before and after tightening the laces).
What I learned: Hip gussets are awesome. Gussets in general are a wondrous thing for the curvy woman.
What I might try next time: Gussets in the bust. I am wondering how that could affect the support and shape up top.
Final Thoughts: This corset turned out great and is as useful as the black underbust. It does have a more drastic shape and a little less mobility, but it is still fairly comfortable for several hours wear and dancing and moving around.


 |
| Photo copyright Fran Eber |
My First Corset (Black Mid-bust)
The Do-Everything Corset (Black under-bust)
Claymore Corsets (White over-bust)
Old Pants Deconstructed Corset (Tan under-bust)
Wednesday, August 29, 2012
Claymore Corsets (White Over-bust)
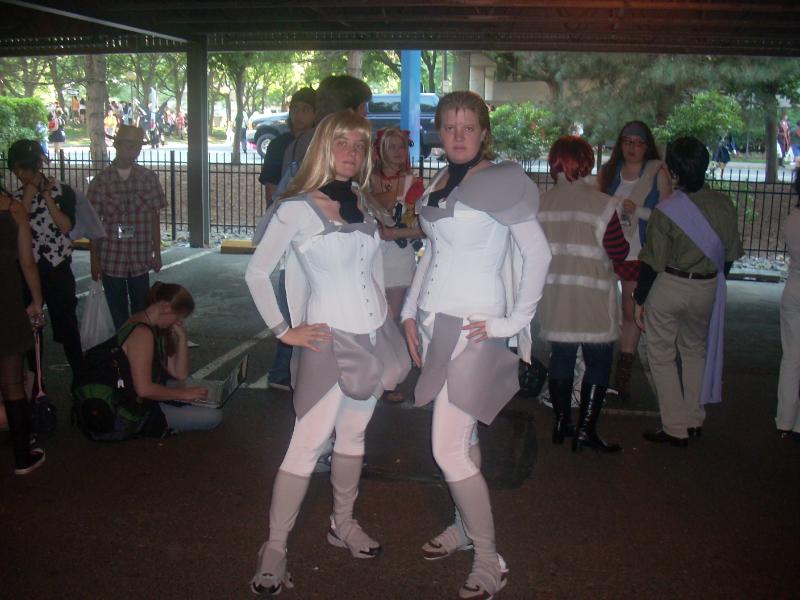 |
| Photo by natendowli |
AnimeNext 2008 two of my sisters, a friend, and I cosplayed characters from Claymore.
 Backstory: AnimeNext is a NJ convention for anime and manga fans. Two of my sisters (C&S) and I have attended a few years. In 2008, we decided to make costumes of characters from Claymore, which seemed to lend themselves to corsets.
How I did it: I was intending to make corsets for each of the four of us, but ran out of time. The finishing work on one of the corsets was completed on site at the hotel on Friday night of the convention.
I made two corsets - one that mostly fit me and C, and the other that fit S and would be okay but not a great fit for the friend. Both were made using the Laughing Moon Dore pattern, with I believe a C-cup bust on the smaller and a D-cup bust on the larger (I could be wrong).
The corsets were made out of two layers of white foundation fabric (I forget exactly what, perhaps a cotton duck or herringbone twill) and a fashion layer of what is probably the worst fabric to try to put on a corset, a stretchy dance/swim fabric (which we were using for the two-piece bodysuits we wore beneath the corsets). I wanted to use the dance/swim fabric on the corset so that the pieces would look like they went together, but it was extremely hard to work with. I used the sandwich method previously mentioned and while the actual construction part went fine (as the stretchy fabric was sandwiched between the foundation layers) the top-stitching was a problem.
The smaller corset has a bone on each seam and mid-panel; the larger one has only bones on the seams. They are boned with steel. I did not use binding on the edge, as I had left a bit of extra fabric intending on stitching it down on the inside of the corset to draw less attention to the edge.
I also designed and made the bodysuit pieces, and my mom and C and S made the armor (vinyl) and spats. My sisters also made the claymore foam swords you see in the pictures.

What I might try next time: Mock-ups for everyone. Also, I would probably use the sandwich method, but fold over the foundation layers and sew the bone channels before folding the dance/swim fabric over to avoid doing any top-stitching on the dance/swim, which should smooth out the fabric and bring the corset closer to the look of the manga (less visible seams and stitching). I actually have the already-cut material and supplies to do the other two corsets, I just haven't gotten myself focused enough to sit down and do it.
Final Thoughts: Like most of my projects, I gave myself a very short time to complete this. I think considering the time restriction and the difference in vision between me and my mom and sisters the end product turned out pretty well.
Other Corset Posts:
My First Corset (Black mid-bust)
The Do-Everything Corset (Black under-bust)
Rikku/Steampunk Corset (Green mid-bust)
Old Pants Deconstructed Corset (Tan under-bust)
Tuesday, August 28, 2012
The Do-Everything Corset (Black Under-bust)

 Backstory: Halloween, 2007. We were going to a costume party and I decided to make our costumes to a theme - drinking (since that's what most people do at those parties anyway). I made my husband a pirate coat and he went as Captain Morgan. I made myself this corset and went as the St. Pauli Girl.
How I did it: I made a mock-up out of muslin and heavy-duty cable ties using the Laughing Moon Dore pattern. I drew the basic shape of the corset on the mockup and then cut it down and tried it back on. Once I was pleased with the shaping of the top edge I transferred that shape to the pattern and cut it out of the same black moleskin suede I used for the first corset I made. I also cut out a lining of black fabric.

What I learned: I can make a corset in a very short time frame that looks pretty good and holds up to the test of several hours of wear and dancing in the club.
What I might try next time: I would like to make another under-bust with steel boning.
Final Thoughts: This corset has lasted almost five years, countless club nights, being worn for hours at a time... Awesome!


Other Corset Posts:
My First Corset (Black Mid-bust)
Claymore Corsets (White over-bust)
Rikku/Steampunk Corset (Green mid-bust)
Old Pants Deconstructed Corset (Tan under-bust)
Monday, August 27, 2012
My First Corset (Black Mid-bust)

Backstory: At some point when I joined livejournal I stumbled upon the corsetmakers community. Being inspired by all the amazing things they made, I decided to get myself a kit and some fabric and give it a go.

I made a mock-up from white muslin and the boning and busk (front closure) from the kit. I did the mock-up in a size 14, I believe with the b-cup bust shaping. The mock-up closed all the way in the back, so I decided to take off two inches for the final version. One thing I did not consider when deciding what to do with the size for the final version was that one layer of muslin was going to have a lot more give than what ended up being three layers (a skull bandanna print fashion cotton lining, the strength layer cotton drill, and the moleskin suede exterior).

What I learned: As I mentioned above, one layer of fabric does different things than three. Additionally, sewing the outside and inside separately and then trying to line everything up is a giant PITA. After I completed this I switched my method to sewing all the layers together on each seam, using the method outlined by another corsetmaker here. Since this corset ended up being too small and a touch too short, I sold it online.
What I might try next time: I've made a few other corsets since this one, using the sewing method above and generally only two layers of fabric. I haven't gotten around to making myself another mid-bust (or overbust) black corset, but I'd like to eventually recreate this in a better fit with a little length added.
Final Thoughts: This was my first real corset (I made a corset-like item for my sister previous to this). It turned out pretty nicely, and hopefully went on to a full life in its new home.


Other Corset Posts:
My First Corset (Black mid-bust)
The Do-Everything Corset (Black under-bust)
Claymore Corsets (White over-bust)
Rikku/Steampunk Corset (Green mid-bust)
Old Pants Deconstructed Corset (Tan under-bust)
Sunday, August 26, 2012
DomiKNITrix Snood

Saturday, August 25, 2012
Knit Fingerless Gloves

Friday, August 24, 2012

Thursday, August 23, 2012
Crochet Tiny Hats

Wednesday, August 22, 2012

Tuesday, August 21, 2012


Misery Logo - Unfinished

Once I was part of a group of people trying to encourage each other to artistry, and the name of our project was Misery Competition.
Monday, August 13, 2012
Steampunkish Jewelry

Steampunk. That thing that's really cool right now. Victorian and Edwardian stylings, every shade of brown, gears and gadgets. My sister and I found a bunch of random toolbox objects and some wire and played around to make jewelry.
Subscribe to:
Posts (Atom)