
Showing posts with label design. Show all posts
Showing posts with label design. Show all posts
Thursday, July 11, 2013
Friday, June 7, 2013

Thursday, October 18, 2012

Wednesday, October 17, 2012

Friday, August 31, 2012
Old Pants Deconstructed Corset (Tan under-bust)
 |
| I swear there's a corset behind everything! |
Backstory: We were going to a post-apocalyptic LARP, and I wanted to craft a "work corset" for my character to wear. (See the Swampy Outfit post for more about LARP.)

First, I deconstructed the pants. They were my father's old work pants, so there was plenty of fabric to work with. I decided to use part of the back of the pants to create leg aprons with pockets (going for a utilitarian look here), so I set that aside, then figured out how to use the rest of the pants.
I thought it would be cool to use the pants pockets on the corset somehow, so I seam-ripped them apart from the other part of the fabric. I cut them long enough that I could put them over the front panels between the first and third panels. I sewed the panels together using the sandwich method, adding black strapping between the first and second panels for the front buckle closures. I sewed the bone channels as I went, so I was able to fold back the pockets while I sewed the channels in the second panel, then lay them back over to sew the seam between panel two and three. I also added strapping across panel three (which I used to clip a water bottle to at the event).

What I learned: The black strapping is cool, but I think next time I'll look for something that is heat friendly (I accidentally tapped it with the iron a few times when trying to press seams, you can imagine the burny smell and meltiness). (From writing these blogs, I've learned that I don't do anything with the appropriate amount of time allotted.)
What I might try next time: I would try to be a little more careful with lining up my pieces. I was working with scraps, so some pieces barely had enough fabric to cover the whole piece, and it actually contributes to the look for it to be held together with safety pins and willpower, but I like my pieces to have a certain level of quality to them, even if they are supposed to look like they are falling apart.
Final Thoughts: Well, I only went to this particular game twice, but I really liked the idea behind the costume (my sketch for it is actually way cooler than the outfit itself). I have worn the corset as part of an outfit while out for a friend's birthday at a bar, so I am not worried that I won't get good use out of it. It was another adventure in short deadline corsetry that turned out pretty well.


 |
| Picture by Thomas Senger (my crop) |
My First Corset (Black mid-bust)
The Do-Everything Corset (Black under-bust)
Claymore Corsets (White over-bust)
Rikku/Steampunk Corset (Green mid-bust)
Wednesday, August 29, 2012
Claymore Corsets (White Over-bust)
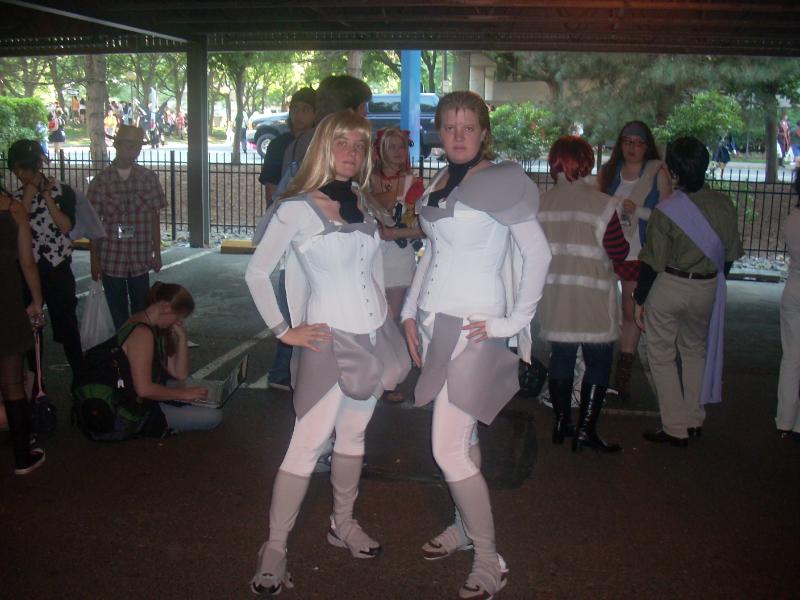 |
| Photo by natendowli |
AnimeNext 2008 two of my sisters, a friend, and I cosplayed characters from Claymore.
 Backstory: AnimeNext is a NJ convention for anime and manga fans. Two of my sisters (C&S) and I have attended a few years. In 2008, we decided to make costumes of characters from Claymore, which seemed to lend themselves to corsets.
How I did it: I was intending to make corsets for each of the four of us, but ran out of time. The finishing work on one of the corsets was completed on site at the hotel on Friday night of the convention.
I made two corsets - one that mostly fit me and C, and the other that fit S and would be okay but not a great fit for the friend. Both were made using the Laughing Moon Dore pattern, with I believe a C-cup bust on the smaller and a D-cup bust on the larger (I could be wrong).
The corsets were made out of two layers of white foundation fabric (I forget exactly what, perhaps a cotton duck or herringbone twill) and a fashion layer of what is probably the worst fabric to try to put on a corset, a stretchy dance/swim fabric (which we were using for the two-piece bodysuits we wore beneath the corsets). I wanted to use the dance/swim fabric on the corset so that the pieces would look like they went together, but it was extremely hard to work with. I used the sandwich method previously mentioned and while the actual construction part went fine (as the stretchy fabric was sandwiched between the foundation layers) the top-stitching was a problem.
The smaller corset has a bone on each seam and mid-panel; the larger one has only bones on the seams. They are boned with steel. I did not use binding on the edge, as I had left a bit of extra fabric intending on stitching it down on the inside of the corset to draw less attention to the edge.
I also designed and made the bodysuit pieces, and my mom and C and S made the armor (vinyl) and spats. My sisters also made the claymore foam swords you see in the pictures.

What I might try next time: Mock-ups for everyone. Also, I would probably use the sandwich method, but fold over the foundation layers and sew the bone channels before folding the dance/swim fabric over to avoid doing any top-stitching on the dance/swim, which should smooth out the fabric and bring the corset closer to the look of the manga (less visible seams and stitching). I actually have the already-cut material and supplies to do the other two corsets, I just haven't gotten myself focused enough to sit down and do it.
Final Thoughts: Like most of my projects, I gave myself a very short time to complete this. I think considering the time restriction and the difference in vision between me and my mom and sisters the end product turned out pretty well.
Other Corset Posts:
My First Corset (Black mid-bust)
The Do-Everything Corset (Black under-bust)
Rikku/Steampunk Corset (Green mid-bust)
Old Pants Deconstructed Corset (Tan under-bust)
Tuesday, August 21, 2012


Misery Logo - Unfinished

Once I was part of a group of people trying to encourage each other to artistry, and the name of our project was Misery Competition.
Saturday, August 11, 2012
Portable Growth Chart

Subscribe to:
Posts (Atom)