Showing posts with label animenext. Show all posts

Thursday, August 30, 2012

Rikku/Steampunk Corset

I made this corset for an adapted cosplay of Rikku from FFX2 for AnimeNext 2010.


The original costume, 2009

Backstory: In 2009 two of my sisters and I cosplayed as Yuna, Rikku, and Payne from FFX2. As much as I love my adult body, I am a little tummy-conscious, so I decided to use the leftover fabric from the skirt for that costume to make a corset to wear with it so I didn't feel so self-conscious. My sister cosplaying Payne wore my black underbust corset as part of her costume for the same reason. It actually worked pretty well.

How I did it: I tweaked the pattern I've used for the Dore a little again, then cut out the pieces from the leftover fabric. For this corset I gave hip gussets a try, because I needed a little extra space in the hip and lower back edge.

I inserted the busk and then sewed the pieces together using the sandwich method previously referenced. At the back edge I pressed the fabric over and top-stitched right next to the edge to finish each half. I created bone channels as usual, except I left out some of the mid-panel bones because the panels were not really wide enough at the waist to accommodate an extra bone. It is boned with 1/4 in spirals and 1/2 in flat steels. Then I attached the binding in a similar way to what I did for the black underbust, by machine sewing the binding to the outside then flipping it to the inside and top-stitching from the outside to create a nice stitch effect (the inside is slightly messier looking because there is a flap of fabric that was excess from the binding, but nobody has to see the inside now do they?). I also sewed a simple rectangle of fabric to function as a modesty panel behind the lacing (no bones in it, just fabric that I usually have to have someone else help me straighten out before and after tightening the laces).

What I learned: Hip gussets are awesome. Gussets in general are a wondrous thing for the curvy woman.

What I might try next time: Gussets in the bust. I am wondering how that could affect the support and shape up top.

Final Thoughts: This corset turned out great and is as useful as the black underbust. It does have a more drastic shape and a little less mobility, but it is still fairly comfortable for several hours wear and dancing and moving around.

Photo copyright Fran Eber
Other Corset Posts:
My First Corset (Black Mid-bust)
The Do-Everything Corset (Black under-bust)
Claymore Corsets (White over-bust)
Old Pants Deconstructed Corset (Tan under-bust)

Wednesday, August 29, 2012

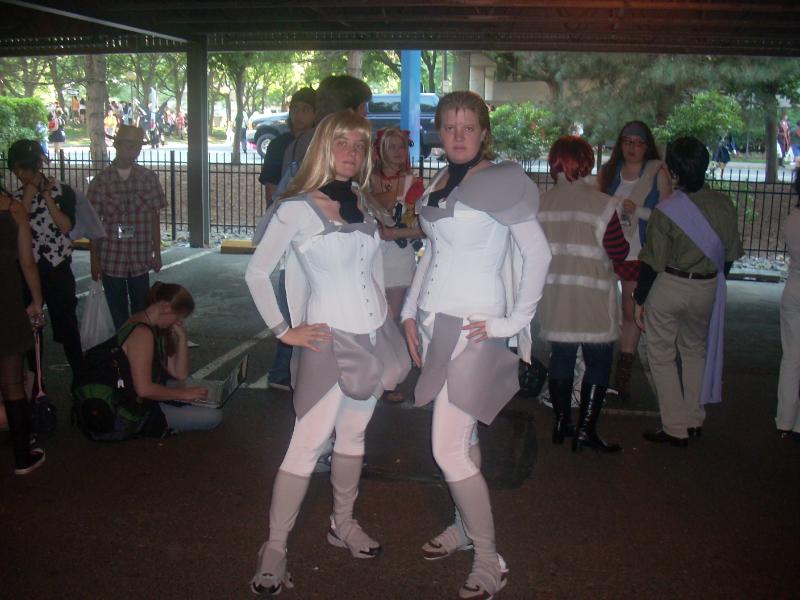
Claymore Corsets (White Over-bust)

Photo by natendowli

AnimeNext 2008 two of my sisters, a friend, and I cosplayed characters from Claymore.

Backstory: AnimeNext is a NJ convention for anime and manga fans. Two of my sisters (C&S) and I have attended a few years. In 2008, we decided to make costumes of characters from Claymore, which seemed to lend themselves to corsets.

How I did it: I was intending to make corsets for each of the four of us, but ran out of time. The finishing work on one of the corsets was completed on site at the hotel on Friday night of the convention.

I made two corsets - one that mostly fit me and C, and the other that fit S and would be okay but not a great fit for the friend. Both were made using the Laughing Moon Dore pattern, with I believe a C-cup bust on the smaller and a D-cup bust on the larger (I could be wrong).

The corsets were made out of two layers of white foundation fabric (I forget exactly what, perhaps a cotton duck or herringbone twill) and a fashion layer of what is probably the worst fabric to try to put on a corset, a stretchy dance/swim fabric (which we were using for the two-piece bodysuits we wore beneath the corsets). I wanted to use the dance/swim fabric on the corset so that the pieces would look like they went together, but it was extremely hard to work with. I used the sandwich method previously mentioned and while the actual construction part went fine (as the stretchy fabric was sandwiched between the foundation layers) the top-stitching was a problem.

The smaller corset has a bone on each seam and mid-panel; the larger one has only bones on the seams. They are boned with steel. I did not use binding on the edge, as I had left a bit of extra fabric intending on stitching it down on the inside of the corset to draw less attention to the edge.

I also designed and made the bodysuit pieces, and my mom and C and S made the armor (vinyl) and spats. My sisters also made the claymore foam swords you see in the pictures.

What I learned: You can't treat the swim/dance fabric like normal fabric. There was a lot of issue with puckering. Also, I would have had a better fit all around if I had the time to do a mock-up for each of us (I had a mock-up for S, which is why the corset she and our friend wore fit her rather well; the other corset was done with just measurements for C and had upper edge gap issues).

What I might try next time: Mock-ups for everyone. Also, I would probably use the sandwich method, but fold over the foundation layers and sew the bone channels before folding the dance/swim fabric over to avoid doing any top-stitching on the dance/swim, which should smooth out the fabric and bring the corset closer to the look of the manga (less visible seams and stitching). I actually have the already-cut material and supplies to do the other two corsets, I just haven't gotten myself focused enough to sit down and do it.

Final Thoughts: Like most of my projects, I gave myself a very short time to complete this. I think considering the time restriction and the difference in vision between me and my mom and sisters the end product turned out pretty well.

Other Corset Posts:
My First Corset (Black mid-bust)
The Do-Everything Corset (Black under-bust)
Rikku/Steampunk Corset (Green mid-bust)
Old Pants Deconstructed Corset (Tan under-bust)